Tuesday, 31 May 2011

Lace and Cable Mitts


Just put up a new pdf knitting pattern on Etsy and Ravelry. A beautiful pair of lace and cable armwarmers. 


They're  a gorgeous pair of mitts in a lace and cable pattern, with fisherman's rib on the palm. These are very cosy, knitted in a supersoft cashmere blend yarn. Having said that, any aran/worsted weight yarn would do - substitute your favourite! They would make an ideal gift, or a special treat for yourself. 


Design uses 'fake cable' techniques, i.e. left twists and right twists. They are both much easier tp knitthan using a cable needle and practically indistinguishable. It also uses lace stitches k2tog, ssk and yo. Full instructions are included in pdf.  This pattern would be suitable for any knitter from an adventurous beginner upwards!

Thursday, 19 May 2011

Handspun Yarn on Etsy


So, my thesis is finished now and I have a few months to relax before starting a PGDE course. So obviously the natural course of action is to spend those months playing with fibre. I've been handspinning with a drop spindle for a wee while now, but for my thesis-finishing present to myself I bought an Ashford Joy spinning wheel. I love it. I am glued to it. How I managed without a wheel for so long is beyond my comprehension.


To cut a long story short, I am going to start selling some handspun yarn in my etsy shop (at least those skeins I can bear to part with). First up is a beautiful fluffy white cloud of a skein of Falkland yarn. It's pretty similar to merino, and I'm leaving it undyed so you can dye it the way you like (or leave it plain and simple). As you can perhaps see from the pictures, it's a wee bit thick and thin, a little fluffy and somewhere between worsted and chunky weight. Delicious. 


Also, to sweeten the deal, I'm going to give you guys a 10% discount on everything in the shop this week, just enter the code MMMHANDSPUN at the checkout. 


Monday, 16 May 2011

Twisted Reversible Hat


Knitted this one up for my mum's birthday. It's a less girly version of my Pirouette Hat in that it has one too few stitches in the round, which makes the pattern spiral as you work it up. The pattern itself is incredibly simple, until you get to the decreases, you're just working knit 2 purl 2. The fact that the number of stitches in a round isn't divisible by 4 means you don't get 2x2 rib, but a lovely spiral pattern. It's reversible too, in fact, I reckon the wrong side is the nicer of the two. This yarn is really gorgeous too, the soy fibre gives it a lovely sheen and I love the gradual colour changes. Hope you enjoy the pattern!


Yarn : Rowan Tapestry, one ball (=120m)


Needles : Four 4mm/US 6 dpns

Gauge:  22 stitches =4'' with 4mm/US6 needles in stocking stitch.
Size: To fit an average 22'' head.
 
Notation: 
k = knit
p = purl
ssk = slip two stitches knitwise, then knit the together with the left-hand needle
CO = cast on


Directions

Spiral Pattern
Just keep working *k2p2* !! The number of stitches in a row isn't divisible by four, so you won't end every row with "p2", but just keep going and you'll get the lovely textured spiral pattern shown. If you have any questions about this please either leave a comment below or email me at d.j.winn "at" hotmail "dot" co "dot" uk. 


 CO 87 stitches. Work in k2 p1 rib for 1 1/2 inches (or around 10 rows). Now work spiral pattern until your hat measures around 7 1/2 inches, ending with a row that ends "k2 p2". Now work decreases as follows:

After knitting a row that ends "k2 p2":
Row 1: *ssk p2 k2 p2* to last 7 stitches, ssk p2 k2 p1.
Row 2: *k2 p2 k2 p1* to last 6 stitches, k2 p2 k2.
Row 3: *ssk k1 p2 k2* to last 6 stitches, ssk k1 p2 k1.
Row 4:  k3 *p2 k4* to last  2 stitches, p2.
Row 5: *ssk k2 p2* to last 5 stitches, ssk k2 p1.
Row 6: *k1 p1 k2 p1* to last 4 stitches, k1 p1 k2.
Row 7: *ssk p1 k2* to last 4 stitches, ssk p1 k1.
Row 8:  k1 *p2 k2* to last 2 stitches, p2.
Row 9: *ssk p2* to last 3 stitches, ssk p1.
Row 10:  *k2 p1* to last 2 stitches, k2.
Row 11: *ssk k1* to last 2 stitches, ssk.
Row 12:  *ssk* to last stitch, k1.

Cut the yarn leaving a 10'' tail. Thread this through the remaining stitches and pull tight. Sew over the hole a couple of times (keeping it neat on both sides since this is a reversible hat), and weave in the loose end (on right or wrong side, but keep it hidden!). I wove the end of the yarn in and out of the stitches in the line of  ssks, this kept things pretty neat. 

Tuesday, 5 April 2011

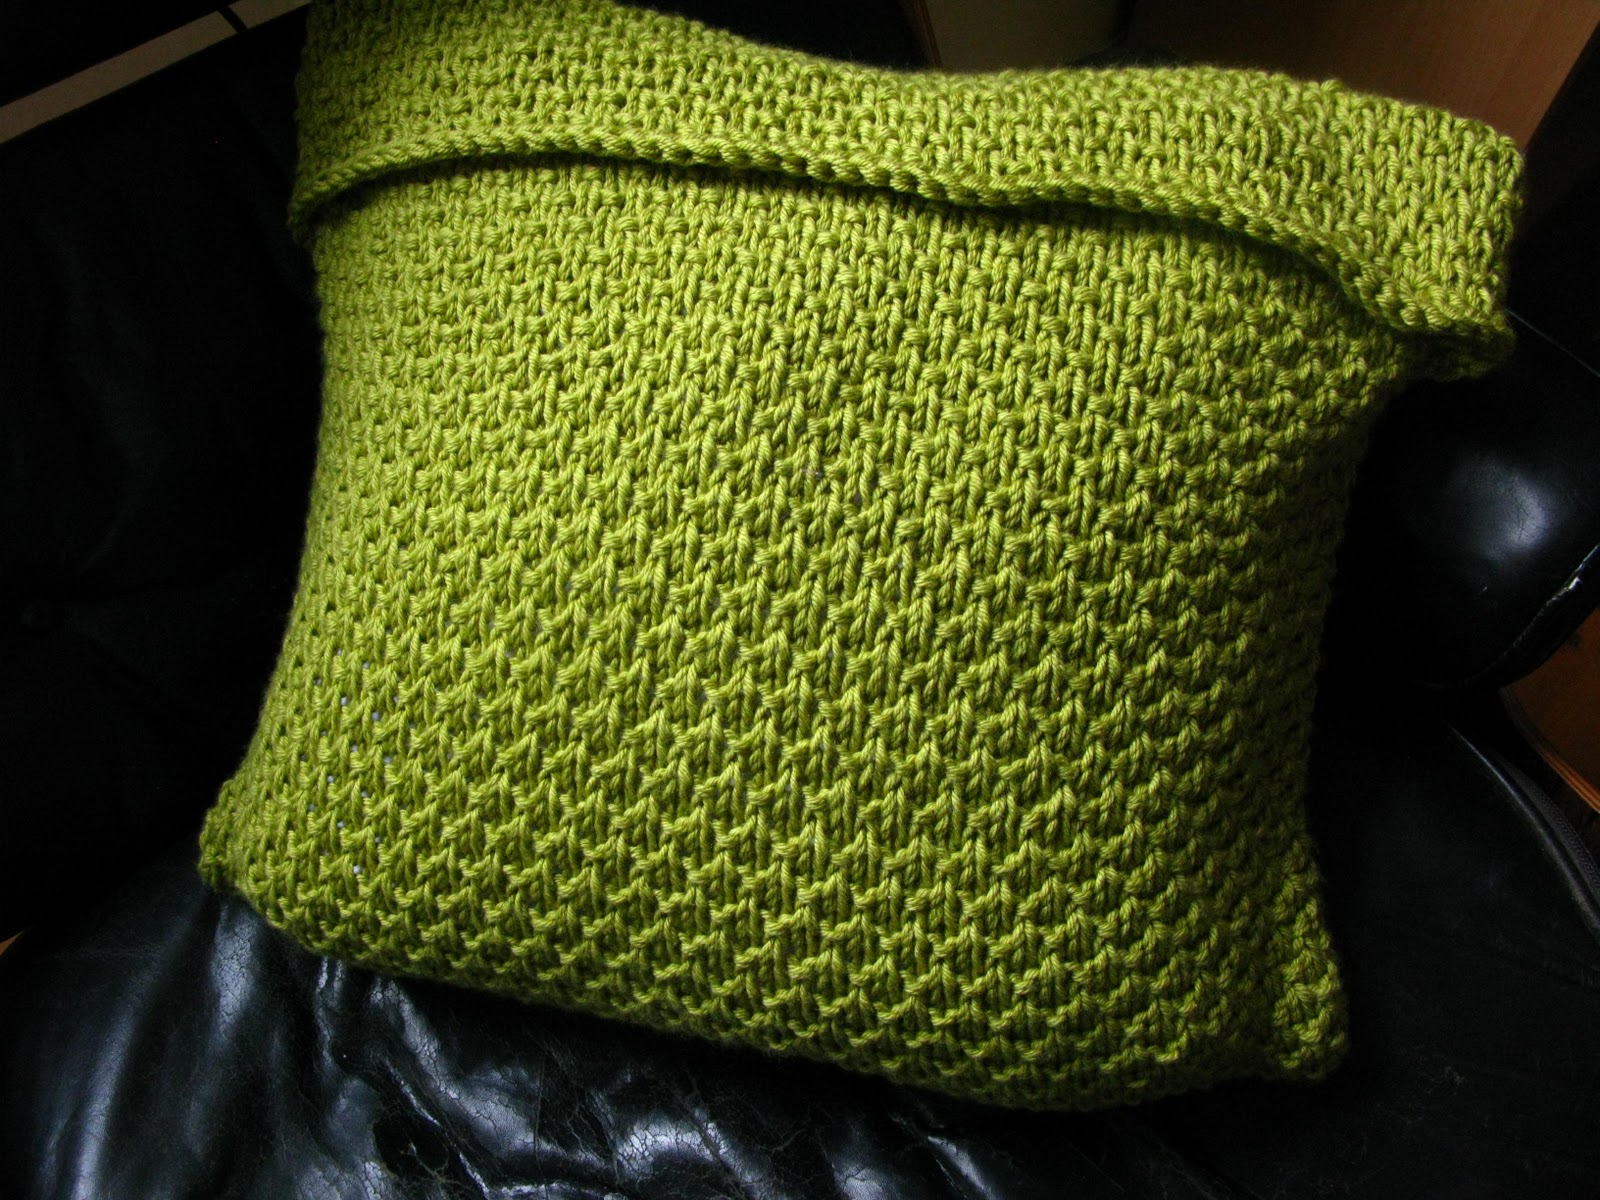
Pea Soup Cushion


This one was commissioned by my parents for their new uberflat in Glasgow. My Mum loves this retro kind of green, and wanted something simple but not just stocking stitch. They seemed pretty pleased with it, and I hope you'll like the pattern too! 


I'm sure this stitch pattern must have a name, it seems so simple. (I actually copied it from a pair of my boyfriend's mum's handknitted ovengloves!) I'm going to refer to it as pea soup stitch: it's pretty smooth with the odd lump, and the colour's about right. If you know the real name please let me know! 


Yarn : Debbie Bliss Cashmerino Aran, 8 balls = 728m, held double throughout.

Needles :  8 mm/US 11

Gauge:  Held singly, gauge is 18sts/ 4'' in stocking stitch with 5mm/US 8 needles.
            Held double, gauge is 11 sts/ 4'' in stocking stitch with 8mm / US 11 needles.
Size: To fit a 45cm x 45cm cushion pad.

Extras: You might want a couple of buttons and a crochet hook to crochet some button loops.

Notation: 
k = knit
p = purl
CO = cast on


Directions:

Pea Soup Stitch: 
Row 1: k2 *p1 k1* to last stitch, k1.
Row 2: purl.
Row 3 k1 *p1 k1* to end.
Row 4: purl.


With yarn held double, CO 45 stitches. Work in pea soup stitch until cushion cover measures 100cm, then bind off loosely. Fold up the the bottom leaving 12cm at the top as shown below (i.e. fold up the bottom 44cm). 


Pin in place and sew up the sides using mattress stitch. 

Fold the top 12cm over and sew in place down the sides.

You might want to sew a couple of buttons on as shown below, I crocheted two button loops for them by working 10 chain stitches from the "bind off" edge with a 5mm crochet hook (yarn held singly). 

Weave in loose ends and you're done!


Sunday, 3 April 2011

New design on Etsy and Ravelry!


Great news! Another lovely pattern is up for sale on Ravelry and in my Etsy shop.


The Avena cowl is a beautiful lace cowl in a lovely fuzzy yarn. An understated lace design which could be dressed up or down, it would go equally well with jeans and a t-shirt as with evening dress. The pattern is simple and elegant, pretty but not too fussy.


 The lace pattern is easy to memorize, each repeat has only four rows, two of which are just knit! This cowl would make a gorgeous gift, and it's quick to knit with aran yarn on large 6mm/US 8 needles, and it only uses one skein!


Saturday, 19 March 2011

Superchunky Glam Headband

Please note: this pattern is now available to download as a pdf from Craftsy for $2. It will still be freely available on this blog, but I thought people might want the opportunity to download a pdf version.

free headband knitting pattern

A cute bow headband in a superbulky luxury yarn. This headband knits up incredibly speedily, perfect for a last minute gift. 

Yarn : Debbie Bliss Como, one 50g ball ( = 42 metres) . 

Needles : 10mm / US 15 needles.

Gauge:  10 sts = 4'' in stocking stitch.
Size: To fit an average adult head. It's 18'' around but stretches to be approx 22'' around.

Notation: 
k = knit
p = purl
CO = cast on


free quick knitting pattern

Directions

First make the headband:
Cast on 11 stitches. Work every row the same:

*k1 p1* to last stitch, k1.

Keep going until your headband is around 18'' long. Bind off and sew the short sides together to make a loop. 

Now make the "knot" part for the front:

Cast on 7 stitches. Again, work every row the same:
*k1 p1 * to last stitch, k1.

Keep going until the "knot" is 5'' long.

Now comes the (slightly) trick bit. Wrap the 5'' "knot" around the headband (preferably covering the headband seam) and sew its shorter ends together. 

Weave in any loose ends and you're done!

Tuesday, 8 March 2011

This Just In: World's Softest Hat Found!

 I knitted this one up for my brother's birthday. To make it totally complaint-proof, I made it the softest yarn I could find in John Lewis haberdashery section. After twenty minutes or so of skein-fondling I came across this gem, it really is at the pinnacle of itch-freeness. However, it's also a little fuzzy for the cable pattern to come through as well as it might. This was perfect for me, knowing that most menfolk prefer an understated hat, but if you want the cables to really show you might want a smoother yarn. 


Yarn : Rowan Lima, one 50g ball ( = 100 metres) . 

Needles : Four 5mm/US 8 dpns plus a cable needle.

Gauge:  20 sts in stocking stitch using 5.5 mm needles (although note this pattern uses 5mm needles, having said that, using 5.5mm needles would be fine too.... )
Size: To fit an average adult head, stretches to be approx 22'' around and 9'' high.

Notation: 
k = knit
p = purl
CO = cast on
k2tog = knit two stitches together
p2tog = purl two stitches together
sl = slip (with yarn held to the back of your work)
C3B = slip two stitches onto cable needle and hold at the back of your work. Knit the next stitch on the left hand needle, then the two from the cable needle.
C3F = slip one stitch onto the cable needle and hold at the front of your work. Knit the next two stitches from the left hand needle, then the one on the cable needle.
C4B = slip the next two stitches onto the cable needle and hold at the back of your work. Knit the next two stitches on the left hand needle, then the two from the cable needle.


Directions: 
Cable Pattern:
Row 1: *p2 k7 p2 k1 p2 k1 p2 k4 p2 k1 p2 k1* to end of row.
Row 2: *p2 k7 p2 sl1 p2 sl1 p2 k4 p2 sl1 p2 sl1* to end of row.
Row 3: *p2 c3b k1 c3f p2 k1 p2 k1 p2 c4b p2 k1 p2 k1* to end of row.
Row 4: As row 2.

CO 81 stitches. Work in k2 p1 rib for 10 rows, or until ribbed section is 1 1/2 inches high. Now work in cable pattern until hat measures around 7'' from cast on edge, making sure to end on row 4 of the cable pattern.

Work decreases as follows:
Row 1: *p2 k7 p2 k1 p2tog k1 p2tog k4 p2 k1 p2tog k1* to end of row.
Row 2: *p2 k7 p2 sl1 p1 sl1 p1 k4 p2 sl1 p1 sl1* to end of row.
Row 3: *p2tog c3b k1 c3f p2tog k1 p1 k1 p1 c4b p2tog k1 p1 k1* to end of row.
Row 4: *p1 k7 p1 sl1 p1 sl1 p1 k4 p1 sl1 p1 sl1* to end of row.
Row 5: *p1 k7 p1 k2tog twice k4 k2tog p1 k1 * to end of row
Row 6: knit
Row 7: *k4 k2tog* to end of row.
Row 8: knit
Row 9: *k3 k2tog* to end of row.
Row 10: knit
Row 11: *k2 k2tog* to end of row.
Row 12: knit
Row 13: *k1 k2tog* to end of row.
Row 14: *k2tog* to end of row.

9 stitches remain. Cut the yarn leaving a 6'' tail. Thread this onto a needle and pass through the remaining stitches, slipping them off the dpns as you go. Pull the thread tight to close the hole at the top of the hat and secure the tail inside the hat. Weave in loose ends.