Showing posts with label cables. Show all posts

Sunday, 17 January 2016

Back on Folksy

Last week I published my New Year's Resolution - to give my knitting design all I've got this year, hopefully so I can go part time at my "real" job. So I've re-opened my Folksy shop, for non-brits, Folksy is the UK's version of Etsy. I stopped posting in my Folksy shop a few years ago since it wasn't really bringing in that many sales, but this year I'm going to try to turn that around. Here's how it's looking now:


folksy, craft, online shop, knitting patterns

I've got 15 patterns and an ebook listed so far, which is about half my "pay-for" patterns. I should hopefully get all the rest uploaded this week. Here's a link to the shop if you want to have a wee peek, I would absolutely appreciate any "likes" until it all gets up and running properly! 

I've also resolved to start submitting patterns to magazines, rather than just publishing everything myself. I can be a bit of a hermit, and I reckon this is a good way to get the word out about my work. Here's a few pictures of swatches for the patterns I've been submitting:

cable knitting pattern swatch

It's a cabled hat pattern with short row shaping the make the brim cover your ears properly. I've been out mountain biking lately and while the cold wind was whipping about my ears this seemed like a particularly good idea!


Thursday, 19 November 2015

Cabled Pattern Sale and Indie Design Gift-Along

It's the busiest time of year for knitters, when we're all trying to make the perfect handmade gift. This year we're trying to make things a little easier by running  four different sales. Two weeks ago it was lace, now it's cables! (basic patterns and quick knits are the next two themes!) All our cabled patterns in our Ravelry Store will be 30% off with the coupon code "XmasCables". 

Christmas Knitting pattern sale

It's also the time of year for the Indie Design Gift Along on Ravelry. This is a great knitting event where hundreds of independent pattern designers offer a discount on their patterns, and more importantly we all get together to knit, chat, and inspire one another. This year I'll be looking for a chunky sock pattern to knit for one of my brothers and a couple of hat patterns to knit as gifts for my boyfriend's sisters. And of course I'm always on the lookout for a stunning lace design. This is a really lovely thing for knitters of all abilities from across the globe to take part in, with a real sense of community.

Saturday, 13 December 2014

Christmas Knitting 2014

It's the busiest time of year for knitters, as we try to finish off handcrafted gifts for everyone. Here are four hot off the presses patterns that make perfect last-minute knitted gifts:

colourwork colorwork mitts mittens gloves knitting pattern

Dipped Mitts are cute and quick to knit. Colour-block patterns are so on trend, and a great way to use up ends of yarn. This is one to break out your brightest, boldest colours for. 

Available to download from Ravelry, Etsy and Craftsy.


colourwork colorwork mitts mittens gloves knitting pattern zigzag

Blaze mitts are another eye-catching fairsle design. The yarn is Rowan Felted Tweed, which is a gorgeous alpaca blend that's lightly felted, giving a lovely vintage look.

Available to download from Ravelry, Etsy and Craftsy.


chunky bulky cabled hat knitting pattern

Superchunky Cabled Hat is super quick to knit. It's knitted with worsted weight yarn held double, you could knit it up in an afternoon if you put your mind to it! A classic design that would make a good first cabled project.

Available on Ravelry, Etsy and Craftsy.


fairisle fair isle hat knitting pattern

Arrochar Hat is another winter classic. Fairisle snowflakes and soft, cosy yarn make this a lovely Christmas gift. 

Available to download from Ravelry, Craftsy and Etsy.


Our First Ebook

Proud to announce the release of our first Ebook, Warmth

knitting pattern ebook knitting pattern designer


Warmth is a collection of our cosiest, comfiest patterns - perfect for keeping the winter chill at bay! 

Buachaille Scarf is a chunky lace and cable creation in chunky, undyed bluefaced leicester yarn.

Heron Cardigan is a classic cabled cardigan in a luxurious cashmere blend yarn.
Snowcloud Cardigan is our bestselling pattern - a wearable hug. Chunky yarn and double moss stitch accents make this a winter classic.
Lomond Hat is a cute and quick to knit accessory. Perfect gifting material!
Felted Lace Wrap is an elegant way to keep the heat in. Felting gives this a gorgeous vintage look.


Available as always from Ravelry, Etsy and Craftsy.


Tuesday, 24 July 2012

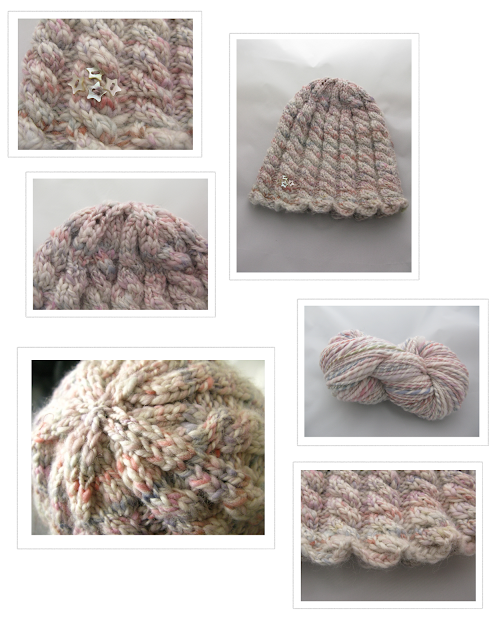
Handspun Star Hat

Handspun star hat by Littletheorem. Quick knit for handspun yarn cables buttons

 Unisex hat in a simple cable pattern shows off the beautiful colours in handspun yarn. This was the first time I had bought handpainted fibre to spin, and watching the colours change as I knitted this up was fascinating. The decreases at the top make a star shape and I added a few tiny star-shaped buttons as a cute detail. The buttons could be omitted (and perhaps more sober yarn used) for a manly version. I also include instructions to avoid the “scalloped” look at the edge. The hat is very stretchy, and will fit more or less any head. While the yarn in the picture is my own handspun yarn, I have suggested several commercially available alternatives.

Yarn: Handspun yarn from handpainted fibre or for example: Malabrigo merino worsted, Cascade yarns sierra, Debbie Bliss Cashmerino Aran. You need 120m in total.
Needles: 5 mm/US 8 dpns
Gauge: 18 stitches = 4” in stocking stitch.
Size: Stretches to fit most heads.
Extras: One 5mm / US 8 cable needle, and some buttons and embroidery thread if desired.
Notation:
CO = cast on
k = knit
p = purl
dpn = double pointed needle.
pm = place marker
slm = slip marker
ssk = slip two stitches knitwise, then knit them together with left hand needle.
K2tog = knit two stitches together
C6F = slip 3 stitches onto cable needle and hold to the front of your work, knit the next 3 stitches from left-hand needle, then the three stitches from the cable needle.

Cable Pattern
Round 1: *k6 p2* to end of round.
Round 2: As round 1.
Round 3: *C6F p2* to end of round.
Round 4: As round 1.

Handspun star hat by Littletheorem. Quick knit for handspun yarn cables buttons

Directions
CO 120 stitches over 3 dpns and join in the round. Work in Cable Pattern until hat measures 6.5”. You might want to make it a little shorter/longer if you have a particularly small/large head. Also, if you want to avoid the scalloped look at the edge of the hat, work in k6 p2 rib for 4 rounds before starting the cable pattern. After 6.5”, ending on round 3, work decreases as follows:

Decrease set up row: k3 pm *k3 (p2 k6) twice p2 k3 pm* to last 21 stitches, k3 (p2 k6) twice p2.

It's easier to give instructions if the start of the round is the first marker, so k3 and we'll start rounds at the marker from now on .

Decrease round 1: *slm k2tog k1 (p2 k6) twice, p2 k1 ssk* to end of round (110 stitches).
Decrease round 2: *slm k2 (p2 k6) twice, p2 k2* to end of round.
Decrease round 3: *slm k2tog (p2 C6F) twice p2 ssk* to end of round (100 stitches).
Decrease round 4: *slm k1 (p2 k6) twice p2 k1* to end of round.
Decrease round 5: *slm k2tog p1 k6 p2 k6 p1 ssk* to end of round (90 stitches).
Decrease round 6: *slm k1 p1 k6 p2 k6 p1 k1* to end of round.
Decrease round 7: *slm k2tog C6F p2 C6F ssk* to end of round (80 stitches).
Decrease round 8: *slm k7 p2 k7* to end of round.
Decrease round 9: *slm k2tog k5 p2 k5 ssk* to end of round (70 stitches).
Decrease round 10: *slm k2tog k4 p2 k4 ssk* to end of round (60 stitches).
Decrease round 11: *slm k2tog k3 p2 k3 ssk* to end of round (50 stitches).
Decrease round 12: *slm k2tog k2 p2 k2 ssk* to end of round (40 stitches).
Decrease round 13: *slm k2tog k1 p2 k1 ssk* to end of round (30 stitches).
Decrease round 14: *slm k2tog p2 ssk* to end of round (20 stitches).
Decrease round 15: *slm k2tog ssk* to end of round (10 stitches).

Cut the yarn leaving a 10'' tail. Thread this through the remaining stitches and pull tight. Sew over the hole a couple of times and weave in any loose ends.


Friday, 9 December 2011

Winter Warmers

Two new patterns out at the moment:

snowcloud cardigan by littletheorem
Snowcloud Cardigan

A soft, warm cardigan to keep you toasty when the snow starts falling. Featuring chunky cuffs and wraparound front in double moss stitch for extra cosiness. Seamless construction and aran yarn make this a quick and satisfying knit. Available to purchase from Ravelry and Etsy.


Yarn: Debbie Bliss Cashmerino Aran 8 (10, 11, 13, 15, 16) skeins at 91m / 100 yds per skein

Needles: One 5mm/US8 100cm circular needle, four 5mm/US 8 dpns or one 16” 5mm/US 8 circular needle. 
Gauge: 18 stitches and 24 rows = 4” in stocking stitch

Dimensions: 
To fit bust 32” (34”, 36”, 38”, 40”, 42”)
Sleeve length: 14” (14½”, 15”, 16”, 16½”, 17”)
Cuff Circumference: 10” (11”, 12”, 13”, 14”, 15”)
Upper Arm Circumference: 11½” (13”, 14”, 15”, 16½”, 17½”)
Back Width: 16” (17”, 18”, 19”, 20”, 21”)
Length Armpit to Hem: 14½” (15½”, 16½”, 17½”, 18½”, 19½”)


Buachaille Scarf

lace and cable scarf knitting pattern


A cosy winter classic. Knitted up in chunky Bluefaced Leicester yarn for the ultimate in warmth and comfort. This is an easy knit, but lace stitches and cables keep it interesting. This design uses “fake cable” stitches – they’re much easier than using a cable needle but practically indistinguishable! Full instructions for all stitches are included in the pattern. Pattern available on Ravelry and Etsy


Yarn: Rowan Purelife British Sheep Breeds Chunky (Bluefaced Leicester) 3 skeins = 330m in total.
Needles: 6.5 mm / US 10 ½ 
Gauge: 12 stitches = 4” in stocking stitch
Dimensions: 8” x 70”


lace and cable scarf knitting pattern

Thursday, 8 December 2011

Kimberley Mitts


cabled mitts free knitting pattern

Knitted these up as a quick Christmas present for my friend Kimberley. Ideal stocking filler knit, very fast and easy to make. The pattern uses fake cable stitches, much easier than using a cable needle but practically indistinguishable.

Yarn:  Rowan Pure Wool Aran
Needles:  4 5mm/US 8 dpns
Gauge: 17 stitches = 4” in stocking stitch.
Dimensions: 6” around, 6½” long (they fit an average ladies hand)
Extras: Three stitch markers, a needle and some scrap yarn. 


Notation: 

CO = cast on
k = knit
p = purl
p1fb = purl one stitch into the front of the next stitch, and one stitch into the back (one stitch increased).
p2tog = purl two stitches together
sl = slip with yarn held back

RT = right twist = knit two stitches together without slipping stitches off the left
needle, knit into first stitch again, then slip both stitches off left hand needle

Youtube video for right twist here.

LT = left twist = knit into the back of the second stitch on left hand needle without slipping it
off the needle. Knit into the first stitch on the needle then slip both stitches off the needle.
Youtube video for left twist here.

free knitting pattern cabled armwarmers


Pattern:

K
im Cable Pattern Chart:


Kim Cable Pattern written instructions:
Row 1: p2 k2 p2 k1 p2 k3 p2 k1 p2 k2
Row 2: p2 RT p2 sl1 p2 RT k1 p2 sl1 p2 RT
Row 3: as Row 1
Row 4: p2 RT p2 sl1 p2 k1 LT p2 sl1 p2 RT

Fisherman’s Rib Pattern:
Row 1: *p2 k1* to end of row
Row 2: *p2 sl1* to end of row

Directions: 
Note: Yarn should be held to the back of your knitting for every slipped stitch.
Left Mitt:
CO 33 stitches over 3 dpns and join in the round. Work in k2 p1 rib for 6 rows. Next row: k2, p1fb *k2 p1* to end of row.
Now work first row of Kim Cable Pattern, place a marker, and work in fisherman’s rib to the end of the row.
Continue working Kim Cable Pattern on the first 19 stitches, and Fisherman’s rib pattern on the remaining 15 stitches. Work 2 repeats of Kim Cable Pattern, then Row 1 once more (i.e. work 9 rows).
Thumb Gusset: p1fb twice, placing a stitch marker between the stitch you purl into the front and the stitch you purl into the back both times. You should have a row starting purl, marker, purl, purl, marker, purl. Now work row 2 of Kim Cable pattern, starting on the third stitch (i.e. starting with the first RT), then work in Fisherman’s Rib to the end of the row. You will continue working as before, but increasing stitches between the two new markers as follows:
Row 1: p1; purl stitches between markers; work in Kim Cable pattern starting on the second stitch (i.e. p1 at the start of the row rather than p2) to next marker; work in Fisherman’s Rib to end of row.
Row 2: p1; slip marker, p1fb, purl to one stitch before next marker, p1fb, slip marker; work in Kim Cable pattern starting on the second stitch to next marker; work in Fisherman’s Rib to end of row.
Repeat these two rows until you have 10 purl stitches between the thumb gusset markers, then work the first row once more. You should just have finished Row 3 of Kim Cable Pattern.
Thread a needle with about 6” of scrap yarn. Next row: p1; slip the 10 stitches between the markers onto the scrap yarn and tie it in a loop to secure the stitches; now continue working Row 4 of Kim Cable Pattern, starting on the second stitch (i.e. p1, RT,…) until marker, work in Fisherman’s rib to the end of the row.
Now continue working Kim Cable Pattern on the first 19 stitches, and Fisherman’s rib pattern on the remaining 15 stitches. Keep going until the mitt measures about 6” from CO edge, ending with Row 1 or Row 3 of Kim Cable Pattern.
Next row: k2, p2 tog, *k2 p1* to end of row. Continue working in k2 p1 rib for 3 more rows. Bind off all stitches.
Thumb: Pick up the 10 thumb stitches on scrap yarn. Purl all stitches and join in the round. (Tip: On the first round, I like to work a p1fb on the last stitch in the round, slip this extra stitch onto the beginning of the first needle, and purl it together with the first stitch on the next round.) Purl every stitch for 4 rows more. Now work k1 p1 rib for 2 rounds. Bind off all stitches.

Right Mitt:
Work as for Left Mitt up to Thumb Gusset, you should just have finished Row 1 of Kim Cable Pattern.
Next Row: work Row 2 of Kim Cable Pattern; slip marker, p1fb twice, placing a stitch marker between the stitch you purl into the front and the stitch you purl into the back both times. After the first marker you should have: purl, marker, purl, purl, marker, purl.  Now continue in Fisherman’s rib pattern, starting on the third stitch (i.e. sl1, *p2 sl1* to end of row).
You will continue working as before, but increasing stitches between the two new markers as follows:
Row 1: Work in Kim Cable pattern up to the first marker; p1, purl stitches between thumb gusset markers, p1, k1; work in Fisherman’s Rib to end of row.
Row 2: Work in Kim Cable pattern up to the first marker; p1, slip marker, p1fb, purl to stitch before next marker, p1fb, slip marker, p1, sl1; work in Fisherman’s Rib to end of row.
Repeat these two rows until you have 10 purl stitches between the thumb gusset markers, then work the first row once more. You should just have finished Row 3 of Kim Cable Pattern.
Thread a needle with about 6” of scrap yarn. Next row: work Row 4 of Kim Cable Pattern; p1, slip stitches between thumb gusset markers onto scrap yarn, p1, sl1; work in Fisherman’s rib to the end of the row.
Now continue working Kim Cable Pattern on the first 19 stitches, and Fisherman’s rib pattern on the remaining 15 stitches. Keep going until the mitt measures about 6” from CO edge, ending with Row 1 or Row 3 of Kim Cable Pattern.
Next row: k2, p2 tog, *k2 p1* to end of row. Continue working in k2 p1 rib for 3 more rows. Bind off all stitches.
Knit the thumb as in left mitt.

Weave in any loose ends and you’re done!

free knitting pattern cabled armwarmers


Tuesday, 31 May 2011

Lace and Cable Mitts


Just put up a new pdf knitting pattern on Etsy and Ravelry. A beautiful pair of lace and cable armwarmers. 


They're  a gorgeous pair of mitts in a lace and cable pattern, with fisherman's rib on the palm. These are very cosy, knitted in a supersoft cashmere blend yarn. Having said that, any aran/worsted weight yarn would do - substitute your favourite! They would make an ideal gift, or a special treat for yourself. 


Design uses 'fake cable' techniques, i.e. left twists and right twists. They are both much easier tp knitthan using a cable needle and practically indistinguishable. It also uses lace stitches k2tog, ssk and yo. Full instructions are included in pdf.  This pattern would be suitable for any knitter from an adventurous beginner upwards!

Tuesday, 8 March 2011

This Just In: World's Softest Hat Found!

 I knitted this one up for my brother's birthday. To make it totally complaint-proof, I made it the softest yarn I could find in John Lewis haberdashery section. After twenty minutes or so of skein-fondling I came across this gem, it really is at the pinnacle of itch-freeness. However, it's also a little fuzzy for the cable pattern to come through as well as it might. This was perfect for me, knowing that most menfolk prefer an understated hat, but if you want the cables to really show you might want a smoother yarn. 


Yarn : Rowan Lima, one 50g ball ( = 100 metres) . 

Needles : Four 5mm/US 8 dpns plus a cable needle.

Gauge:  20 sts in stocking stitch using 5.5 mm needles (although note this pattern uses 5mm needles, having said that, using 5.5mm needles would be fine too.... )
Size: To fit an average adult head, stretches to be approx 22'' around and 9'' high.

Notation: 
k = knit
p = purl
CO = cast on
k2tog = knit two stitches together
p2tog = purl two stitches together
sl = slip (with yarn held to the back of your work)
C3B = slip two stitches onto cable needle and hold at the back of your work. Knit the next stitch on the left hand needle, then the two from the cable needle.
C3F = slip one stitch onto the cable needle and hold at the front of your work. Knit the next two stitches from the left hand needle, then the one on the cable needle.
C4B = slip the next two stitches onto the cable needle and hold at the back of your work. Knit the next two stitches on the left hand needle, then the two from the cable needle.


Directions: 
Cable Pattern:
Row 1: *p2 k7 p2 k1 p2 k1 p2 k4 p2 k1 p2 k1* to end of row.
Row 2: *p2 k7 p2 sl1 p2 sl1 p2 k4 p2 sl1 p2 sl1* to end of row.
Row 3: *p2 c3b k1 c3f p2 k1 p2 k1 p2 c4b p2 k1 p2 k1* to end of row.
Row 4: As row 2.

CO 81 stitches. Work in k2 p1 rib for 10 rows, or until ribbed section is 1 1/2 inches high. Now work in cable pattern until hat measures around 7'' from cast on edge, making sure to end on row 4 of the cable pattern.

Work decreases as follows:
Row 1: *p2 k7 p2 k1 p2tog k1 p2tog k4 p2 k1 p2tog k1* to end of row.
Row 2: *p2 k7 p2 sl1 p1 sl1 p1 k4 p2 sl1 p1 sl1* to end of row.
Row 3: *p2tog c3b k1 c3f p2tog k1 p1 k1 p1 c4b p2tog k1 p1 k1* to end of row.
Row 4: *p1 k7 p1 sl1 p1 sl1 p1 k4 p1 sl1 p1 sl1* to end of row.
Row 5: *p1 k7 p1 k2tog twice k4 k2tog p1 k1 * to end of row
Row 6: knit
Row 7: *k4 k2tog* to end of row.
Row 8: knit
Row 9: *k3 k2tog* to end of row.
Row 10: knit
Row 11: *k2 k2tog* to end of row.
Row 12: knit
Row 13: *k1 k2tog* to end of row.
Row 14: *k2tog* to end of row.

9 stitches remain. Cut the yarn leaving a 6'' tail. Thread this onto a needle and pass through the remaining stitches, slipping them off the dpns as you go. Pull the thread tight to close the hole at the top of the hat and secure the tail inside the hat. Weave in loose ends.


Friday, 31 December 2010

Dochart Scarf

This is a bit of shameless advertising, but I've got a pattern up for sale on etsy and ravelry that's really lovely! It's a really beautiful scarf, with a braided pattern on one side and twists on the other. It knits up very quickly and would make a really nice present, the yarn is so soft and fuzzy and comes in lovely colours. It uses left twists and right twists for a cabled effect, but they're much easier than using a cable needle.

Available for download for a very reasonable $2 at ravelry (you need to be a ravlery member) or etsy