Saturday, 20 October 2012

Updates

Just a quick post to keep everyone up to date with the latest news. First, I've just made a Facebook page, which you can find here. Keep an eye on it for latest pattern and yarn news and hopefully a few giveaways will be coming up in the near future.

I've got a new shawl pattern just out: Buddleia is based on a traditional Estonian leaf lace pattern witht the addition of a floral motif. You can buy the pattern on Ravelry and in my Etsy shop.

Buddleia shawl knitting pattern by Littletheorem. Lace shawl, lace leaves and flowers.


  Next, I've got a jumper pattern in the pipeline, Lochan is a beautiful lacy sweater with a really simple construction. All the shaping's done by changing needles and the lace pattern's easy to remember. It's still being tested at the moment, in fact, if you're interested in testing the sweater in a 32, 48 or 56" bust then you should head to the Ravelry free pattern testers group and volunteer! The pattern should hopefully be available to purchase at the end of November.


Lochan Sweater knitting pattern by Littletheorem. Quick yoked lace sweater pattern.

And finally, fresh off the blocking board is my Eilean shawl. I'm hopefully going to get the pattern written up this week and should be looking for test knitters soon. Keep an eye on the Ravelry free pattern testers group if you're interested!

Here's a wee picture!


Asphodel Shawl by littletheorem. Geometric lace shawl knitting pattern.

Tuesday, 24 July 2012

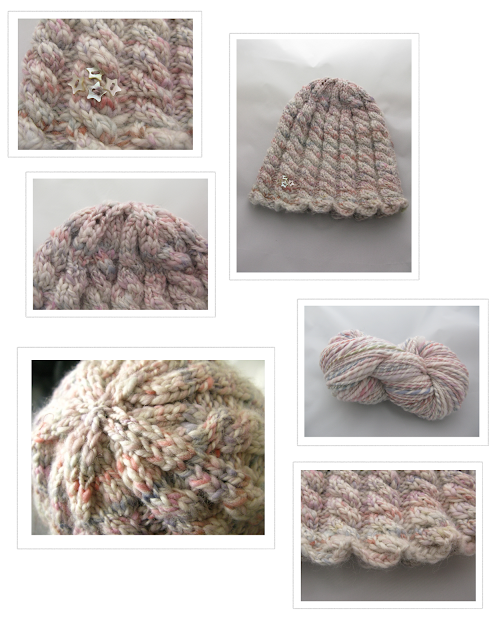
Handspun Star Hat

Handspun star hat by Littletheorem. Quick knit for handspun yarn cables buttons

 Unisex hat in a simple cable pattern shows off the beautiful colours in handspun yarn. This was the first time I had bought handpainted fibre to spin, and watching the colours change as I knitted this up was fascinating. The decreases at the top make a star shape and I added a few tiny star-shaped buttons as a cute detail. The buttons could be omitted (and perhaps more sober yarn used) for a manly version. I also include instructions to avoid the “scalloped” look at the edge. The hat is very stretchy, and will fit more or less any head. While the yarn in the picture is my own handspun yarn, I have suggested several commercially available alternatives.

Yarn: Handspun yarn from handpainted fibre or for example: Malabrigo merino worsted, Cascade yarns sierra, Debbie Bliss Cashmerino Aran. You need 120m in total.
Needles: 5 mm/US 8 dpns
Gauge: 18 stitches = 4” in stocking stitch.
Size: Stretches to fit most heads.
Extras: One 5mm / US 8 cable needle, and some buttons and embroidery thread if desired.
Notation:
CO = cast on
k = knit
p = purl
dpn = double pointed needle.
pm = place marker
slm = slip marker
ssk = slip two stitches knitwise, then knit them together with left hand needle.
K2tog = knit two stitches together
C6F = slip 3 stitches onto cable needle and hold to the front of your work, knit the next 3 stitches from left-hand needle, then the three stitches from the cable needle.

Cable Pattern
Round 1: *k6 p2* to end of round.
Round 2: As round 1.
Round 3: *C6F p2* to end of round.
Round 4: As round 1.

Handspun star hat by Littletheorem. Quick knit for handspun yarn cables buttons

Directions
CO 120 stitches over 3 dpns and join in the round. Work in Cable Pattern until hat measures 6.5”. You might want to make it a little shorter/longer if you have a particularly small/large head. Also, if you want to avoid the scalloped look at the edge of the hat, work in k6 p2 rib for 4 rounds before starting the cable pattern. After 6.5”, ending on round 3, work decreases as follows:

Decrease set up row: k3 pm *k3 (p2 k6) twice p2 k3 pm* to last 21 stitches, k3 (p2 k6) twice p2.

It's easier to give instructions if the start of the round is the first marker, so k3 and we'll start rounds at the marker from now on .

Decrease round 1: *slm k2tog k1 (p2 k6) twice, p2 k1 ssk* to end of round (110 stitches).
Decrease round 2: *slm k2 (p2 k6) twice, p2 k2* to end of round.
Decrease round 3: *slm k2tog (p2 C6F) twice p2 ssk* to end of round (100 stitches).
Decrease round 4: *slm k1 (p2 k6) twice p2 k1* to end of round.
Decrease round 5: *slm k2tog p1 k6 p2 k6 p1 ssk* to end of round (90 stitches).
Decrease round 6: *slm k1 p1 k6 p2 k6 p1 k1* to end of round.
Decrease round 7: *slm k2tog C6F p2 C6F ssk* to end of round (80 stitches).
Decrease round 8: *slm k7 p2 k7* to end of round.
Decrease round 9: *slm k2tog k5 p2 k5 ssk* to end of round (70 stitches).
Decrease round 10: *slm k2tog k4 p2 k4 ssk* to end of round (60 stitches).
Decrease round 11: *slm k2tog k3 p2 k3 ssk* to end of round (50 stitches).
Decrease round 12: *slm k2tog k2 p2 k2 ssk* to end of round (40 stitches).
Decrease round 13: *slm k2tog k1 p2 k1 ssk* to end of round (30 stitches).
Decrease round 14: *slm k2tog p2 ssk* to end of round (20 stitches).
Decrease round 15: *slm k2tog ssk* to end of round (10 stitches).

Cut the yarn leaving a 10'' tail. Thread this through the remaining stitches and pull tight. Sew over the hole a couple of times and weave in any loose ends.


Monday, 25 June 2012

Beaded Rib Headband

Please note: this pattern is now available to download as a pdf from Craftsy for $2. It will still be freely available on this blog, but I thought people might want the opportunity to download a pdf version.

Unisex headband in an interesting textured rib pattern. The pictured headband was knitted with my handspun yarn, but I suggest a commercially available alternative. Instructions are given for two sizes: ladies' and men's. Instructions for smaller size are given first, followed by instructions for larger size in brackets. 

Beaded rib headband free knitting pattern by Littletheorem. Handspun yarn, quick easy knit.

Yarn: Handspun Icelandic yarn OR Solitude Yarns Icelandic, 1 skein. Approx 75 (90) metres of yarn required.
Needles: 4 mm/US 6 dpns
Gauge: 22 stitches = 4” in stocking stitch.
Dimensions: Small: stretches to fit 22” head. Large: stretches to fit 24” head
Notation:
CO = cast on
k = knit
p = purl
dpn = double pointed needle.

Beaded rib headband free knitting pattern by Littletheorem. Handspun yarn, quick easy knit.

 
Directions
Beaded Rib Pattern:
Round 1: *k3, p2* to end of round.
Round 2: *k1, p1, k1, p2* to end of round.

CO 100 (120) stitches over 3 dpns and join in the round.

Work in beaded rib pattern until headband measures 3.5 (4)”

Bind off all stitches and weave in any loose ends and you’re done!
 

Wednesday, 4 April 2012

Beaded Rib Mitts

free knitting pattern ribbed mitts


Unisex mitts in an interesting textured rib pattern. Instructions are given for two sizes: ladies' and men's. Instructions for smaller size are given first, followed by instructions for larger size in brackets. These mittens are knitted in one piece, in the round. The pictured mittens were knitted with my handspun yarn, but I suggest a commercially available alternative.


Yarn: Solitude Yarns Icelandic, 2 skeins. Approx 150 (200) metres of yarn required per pair.
Needles: 4 mm/US 6 dpns
Gauge: 22 stitches = 4” in stocking stitch.
Dimensions: Ladies': 6” around, 10” long, Men's: 8” around 12” long.
Extras: Three stitch markers, a needle and some scrap yarn.

Notation:
CO = cast on
k = knit
p = purl
k1fb = knit one stitch into the front of the next stitch, and one stitch into the back (one stitch increased).
k1fbf = knit one stitch into the front of the next stitch, one stitch into the back, then one more stitch into the front (two stitches increased).
pm = place marker
sl m = slip marker

free mitts knitting pattern


Pattern:

Beaded Rib Pattern:
Round 1: *k3 p2* to end of row.
Round 2: *k1 p1 k1 p2* to end of row.

Mitt Directions (make 2):
CO 40 (55) stitches over 3 dpns and join in the round. Work in Beaded Rib pattern until mitt measures 5½” (6½)”, ending on Round 1 of pattern.

Thumb Gusset:
Next row: k1 pm k1fbf pm k1 p2, work in Beaded Rib pattern to end of row (you should be on Round 2 of the pattern).

You will continue working as before, but increasing stitches between the two markers as follows:
Row 1: k1, slm, knit to next marker, slm, k1 p2, continue in Beaded Rib to the end of the round.
Row 2: k1, slm, k1fb, knit to one stitch before next marker, k1fb, slm, k1 p2, continue in Beaded Rib to the end of the round.
Repeat these two rows until you have 13 (17) stitches between the thumb gusset markers.
Thread a needle with about 6” of scrap yarn. Next row: k1; slip the stitches between the markers onto the scrap yarn and tie it in a loop to secure the stitches; k1fb, p2, continue working in Beaded Rib pattern to the end of the round (you should be on Round 1 of the pattern).

Now continue working Beaded Rib pattern until the mitt measures 10” (12”) from CO edge. Bind off all stitches.
Thumb: Pick up the 13 (17) thumb stitches on scrap yarn. Knit all stitches and join in the round. (Tip: On the first round, I like to work a k1fb on the last stitch in the round, slip this extra stitch onto the beginning of the first needle, and knit it together with the first stitch on the next round.) Work in stocking stitch (i.e. knit every stitch) until the thumb measures 3” (4”) from the base (or as long as you want it).
Next round: *k1p1* to last stitch, k1. Now bind off all stitches.

Weave in any loose ends and you’re done!