Showing posts with label home. Show all posts

Monday, 2 May 2016

St Andrews Visit

Just spent a lovely weekend in St Andrews for my Mum's 60th (Happy Birthday, Mum!)

Lots of scenic forest walks, good food and of course a bit of knitting!

Scotland forest walk


Here's a few pictures from Kemback wood and Dunino Den. Both absolutely carpeted with bluebells and anemones, something a bit magical about the woods in Scotland at this time of year. Lots of wild garlic about too, had a delicious late dinner of wild garlic hummus and homemade pitta bread after the drive back to Glasgow last night.

And we stumbled on Scotland's best kept secret...

cute sheep pic, funny sheep pic

Clearly the Sheep Olympics training grounds!

The secret's out!

And of course, my Mum's birthday present was handknitted. Here's a few pictures of what will be the Castle Sands Shawl (hope to have the pattern released in the next month or so)

beautiful lace knitting


And if you can't wait that long, I should hopefully be releasing the pattern for Loch Katrine Shawl on Wednesday!


lace shawl knitting pattern


Friday, 17 October 2014

Sweet and Simple Cushion

free cushion knitting pattern
A cute cushion cover that knits up quickly using chunky pencil roving. This is a simple knit which uses a couple of clever techniques to give a neat finish. You cast on using a figure-8 cast on so there is no seam at the bottom. Then you use a three-needle bind off at the top with the cushion pad inside so there is no seaming at all. This is a quick knit that would make a great housewarming gift, maybe knit up two or three in complementary colours.

Yarn: Corriedale Pencil Roving

2 x 200g skeins at 130m/143yds per skein


Gauge: 8.5sts and 11 rows = 10cm in stocking stitch with 10mm/US 15 needles


Needles: One 10mm/US 15 100cm/40”

circular needle for working magic loop, one spare straight needle.


Extras: Two stitch markers, crochet hook for weaving in ends, one 40cm x 40cm cushion pad


Dimensions:

To fit a 40cm x 40cm cushion pad.


Notation:

k = knit

p = purl

pm = place marker

slm = slip marker

ssk = slip two stitches knitwise onto right hand needle, then knit them together with left hand needle.

k2tog = knit the next two stitches together.

s = slip purlwise


free knitting pattern cushion

Instructions


Cast on 72 stitches using a figure 8 cast-on, with 36 stitches on each side of the needle. Place marker for beginning of round, and one 36 stitches from the beginning of the round to mark the halfway point.


Work stockinette stitch in the round ( i.e. knit every round) using magic loop method, until the cushion measures 42cm from cast on. Your cushion pad should fit comfortably inside the cover, without the need to stretch it. Put the cushion inside the cover now, and we will bind off with it inside.


Starting from the beginning of the round, we'll cast off stitches using a three-needle bind off. A youtube video showing how to work the three-needle bind off can be found here. However, instead of having stitches on two dpns, we will be knitting together stitches from the two points of you circular needle, and rather than turning the work so that the right sides are facing, we will continue with the two wrong sides facing in. This will leave a ridge at the top which makes a cute feature.


Written instructions for the three-needle bind off are as follows:

Remove stitch marker for beginning of round. Push the first and last stitches in the round to the tips of the needle points, then knit these two stitches together with your spare straight needle.

Push the second and second from last stitches in the round to the ends of the needles, and knit these two stitches together using your spare straight needle.

Slip the original stitch on your straight needle over the stitch you've just worked, as in a normal bind off.

Continue this process: knit the next two stitches at the tips of your circular needle together, then pass the previous stitch on your straight needle over this one.

When you reach the last stitch on your straight needle, cut the yarn leaving a 20cm tail, pass this through the loop on your straight needle and pull it tight.


Thread the loose ends into the cushion cover using your crochet hook and you're done!

free knitting pattern cushion

And a quick plug: Queen's Park Cardigan is now available to purchase on Ravelry, Craftsy and in my Etsy shop.

lace cardigan knitting pattern simple basic blanket front

  It's a fitted cardigan with a flattering drape front in a pretty lace pattern. This is a simple but stunning knit that could be dressed up or down. Queen's Park Cardigan is knitted from the top down with set in sleeves, neat twisted rib edgings and an oversized blanket front. Using sportweight yarn on larger than normal needles and blocking creates an airy fabric with beautiful drape. The lace pattern is simple and suitable for a first lace project, with only a four row repeat. Instructions for 8 sizes are given: to fit bust 28-30 (32-34, 36-38, 40-42, 44-46, 48-50, 52-54, 56-58)”.

simple lace cardigan knitting pattern


Sunday, 18 August 2013

Knit 1 Pearl 1

A cute knitted storage box with pearl detail

trinket box knitting pattern


Yarn: Rowan R2 Rag One ball = 25m/27yds


Needles: One set of 5 6.5mm/US 10.5 double pointed needles


Gauge: 12 stitches = 4” in stocking stitch using 6.5mm/US 10.5 needles. (exact gauge isn't crucial but your knitting should be pretty tight)


Dimensions: 4” x 3” x 2”


Extras: Crochet hook for weaving in ends, needle and thread, three freshwater pearl beads


Notation

k = knit

p = purl

dpn = double pointed needle


Stitch Patterns

Stocking Stitch

Row 1: knit

Row 2: purl

Repeat these two rows for pattern


Garter Stitch in the round:

Round 1: knit

Round 2: purl

Repeat these two rows for pattern


Techniques

Pick Up and Knit

The edge stitches of a piece of knitted fabric look like a column of v shapes. To pick up and knit from the edge, put your needle under the v from front to back, bring your yarn round the needle and pull it through, this is one more stitch on your needle.


If working from a cast on edge, put your needle under each cast on stitch from front to back, bring yarn round the needle and pull it through. Work from left to right along the edge of the knitting picking up and knitting stitches as you go.


Directions

Cast on 10 stitches. Work in stocking stitch for 10 rows, starting with a knit row (it'll be ok to use dpns for this since you have so few stitches).


Next row: k10, with a second dpn, pick up and knit 10 stitches from the left hand side of your knitting, with third dpn, pick up and knit 10 stitches from cast on edge, with fourth dpn, pick up and knit 10 stitches from right hand side of your knitting. You should have 40 stitches on the needles and be ready to work in the round.


In the round (i.e. the next stitches you work will be from the first dpn), work in garter stitch for 8 rows, starting with a purl row. It may be easier for you to work with the box turned inside out.


Bind off all stitches tightly.


Finishing

Weave in any loose ends. Sew the three pearl beads to the bottom of the box as shown.

beaded knitting pattern

Tuesday, 5 April 2011

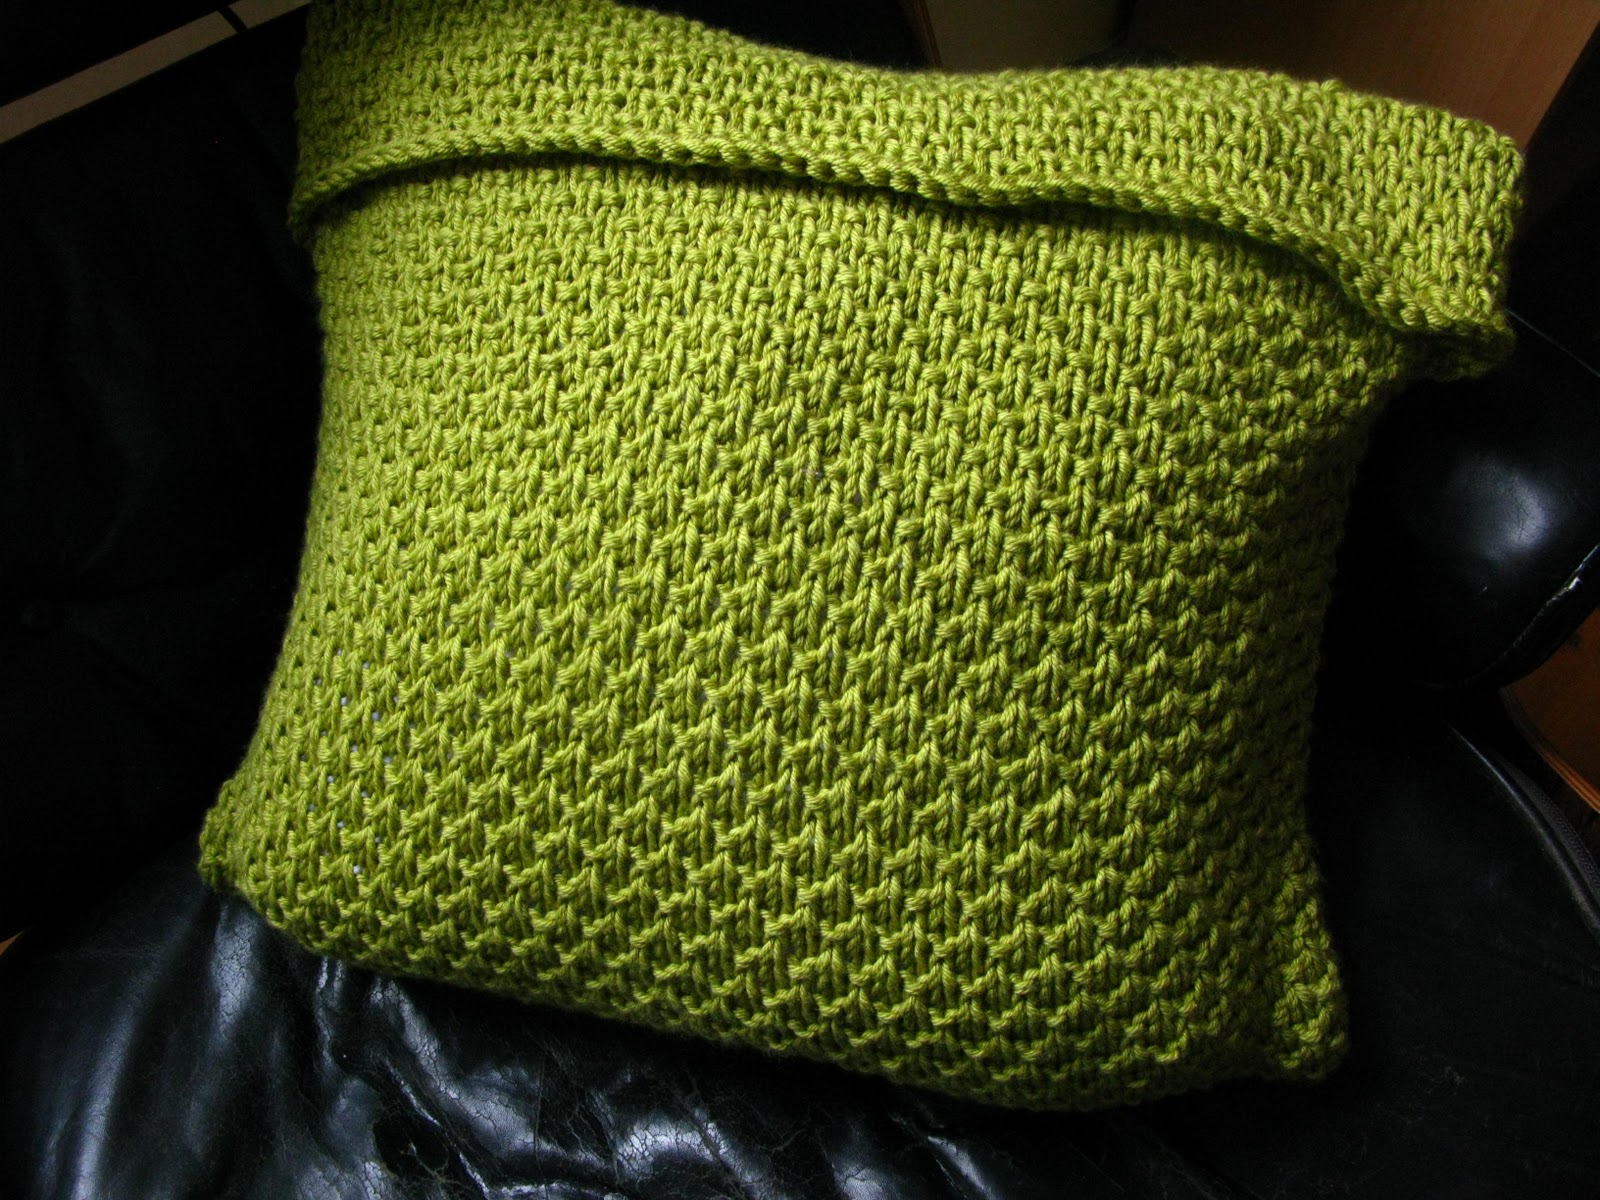
Pea Soup Cushion


This one was commissioned by my parents for their new uberflat in Glasgow. My Mum loves this retro kind of green, and wanted something simple but not just stocking stitch. They seemed pretty pleased with it, and I hope you'll like the pattern too! 


I'm sure this stitch pattern must have a name, it seems so simple. (I actually copied it from a pair of my boyfriend's mum's handknitted ovengloves!) I'm going to refer to it as pea soup stitch: it's pretty smooth with the odd lump, and the colour's about right. If you know the real name please let me know! 


Yarn : Debbie Bliss Cashmerino Aran, 8 balls = 728m, held double throughout.

Needles :  8 mm/US 11

Gauge:  Held singly, gauge is 18sts/ 4'' in stocking stitch with 5mm/US 8 needles.
            Held double, gauge is 11 sts/ 4'' in stocking stitch with 8mm / US 11 needles.
Size: To fit a 45cm x 45cm cushion pad.

Extras: You might want a couple of buttons and a crochet hook to crochet some button loops.

Notation: 
k = knit
p = purl
CO = cast on


Directions:

Pea Soup Stitch: 
Row 1: k2 *p1 k1* to last stitch, k1.
Row 2: purl.
Row 3 k1 *p1 k1* to end.
Row 4: purl.


With yarn held double, CO 45 stitches. Work in pea soup stitch until cushion cover measures 100cm, then bind off loosely. Fold up the the bottom leaving 12cm at the top as shown below (i.e. fold up the bottom 44cm). 


Pin in place and sew up the sides using mattress stitch. 

Fold the top 12cm over and sew in place down the sides.

You might want to sew a couple of buttons on as shown below, I crocheted two button loops for them by working 10 chain stitches from the "bind off" edge with a 5mm crochet hook (yarn held singly). 

Weave in loose ends and you're done!


Saturday, 1 January 2011

Yuzen Cushion Cover

I made this cushion cover seamless and reversible because I couldn't decide which side I liked best, they're both so nice! I absolutely love this yarn, the colours are so beautiful I smile every time I look at it.


Yarn : 2 balls Noro Yuzen = 220m

Needles : One 4.5mm = US 7 circular needle

Extra Materials: 8 buttons, scrap yarn for provisional cast on, 40cmx40cm cushion.

Gauge: 17 stitches = 10cm in stocking stitch.

Size: 40cm x 40cm

Notation: 
k = knit
p = purl
CO = cast on
k2tog = knit two stitches together
yo = bring the yarn over the needle

Directions:

Using a provisional crochet cast on, cast on 56 stitches (see tutorial). Now cast on 50 more stitches the normal way. Knit stocking stitch in the round (i.e. knit every stitch) until cushion cover measures 40cm when slightly stretched (there's not quite enough yarn in 2 skeins of yuzen to make the cushion cover unstretched (sadly)) . Slip 53 stitches onto one side of the circular needle and 53 to the other and bind off using kitchener stitch. 
Now pick up the remaining 56 stitches from your provisional cast on, so that you start on a right side row (= stocking stitch, not rev st. st.). Work as follows:
Row 1: (right side) knit 
Row 2: k2 purl to last two stitches, k2.

Repeat these two rows until you have worked 2'' from provisional cast on. 
Next row: k9 k2tog yo *k10 k2 tog yo* 3 times k9.
Work row 2 as above once more, then knit two rows. BO on wrong side.

The yo's form buttonholes. Sew buttons onto each side to meet up with buttonholes so that the cushion cover is reversible.

Weave in loose ends along the wrong side rows on a stripe of the same colour.

Saturday, 11 December 2010

Dunlochay Cushion Cover


 So, those who know me will be well aware that I'm borderline obsessed with buttons. This pattern's for a cute but simple cushion cover decorated with vintage buttons and bright embroidery thread.
Yarn 4 balls (you won't need all this) Rauma Finullgarn, =700m (you will probably only need around 500m though).

Other Materials Two 2cm buttons, plus extra to decorate if desired, embroidery thread, one 40cmx40cm cushion.

Needles One pair 7mm/ US 8 needles.

Gauge Held singly, 26 stitches = 10cm with 3mm/ US 2 1/2. Held double, 12 stitches = 10cm with 7mm needles.

Dimensions 45 cm across (after light felting)

Notation 
k = knit
CO = cast on
k2tog = knit two stitches together
k2tog tbl = knit two stitches together through the back of the loops
yo = bring the yarn to the front of your knitting.
garter stitch = knit every row
Directions

With yarn held double, CO 45 stitches. Work in garter stitch until your knitting is 80 cm long. 
For 3 rows:
k1 k2tog tbl, k to last 3 stitches, k2tog k1.
 6 stitches decreased, 39 stitches remaining.
Next row:
k1 k2tog tbl k6 yo k2tog k17 yo k2tog tbl k6 k2tog k1
Next 4 rows:
k1 k2tog tbl, k to last 3 stitches, k2tog k1.
Bind of remaining 29 stitches.
Fold the cast on edge up to the start of the decreases. Sew up along the sides. Felt very lightly and block stretched so cushion cover fits a 40cmx40cm cushion. The two yo's form buttonholes, sew the two 2cm buttons onto the cushion cover with embroidery thread to meet the holes. Sew the other buttons on with embroidery thread to decorate.

Sunday, 28 November 2010

Random Stitch Tea Cosy


This is a small tea cosy I knitted up for my parents. It's about 25cm across but very stretchy, so it should fit any smallish teapot. The wool is from The Woolshed on Orkney, it's a very tweedy and rustic worsted weight . Being a bit of a maths obsessive, I designed the pattern algorithmically: it's a repeating pattern of four stitches across by four high, I tossed a coin to see whether to knit or purl each of the sixteen stitches. The pattern ended up being fairly close to 2x2 rib, but with a few knits and purls randomly mixed up, I'm pretty happy with the way this turned out...


Yarn Less than one ball (=50 g , about 100m) The Woolshed Worsted Weight North Ronaldsay Wool

Needles One pair 5mm/ US 8 needles.

Gauge 15 stitches x 20 rows = 10 cm x10 cm in stocking stitch.

Dimensions 25 cm across

Notation 

k = knit
p = purl
CO = cast on
k2tog = knit two stitches together
k2tog tbl = knit two stitches together through the back of the loops
p2tog = purl two stitches together
p2tog tbl = purl two stitches together through the back of the loops 


Directions

Rib Pattern:
Row 1:  *P3 K1* repeat to end.
Row 2: K2 *P1 K3* to last 2 stitches, P1 K1.
Row 3: *K1 P1* to end.
Row 4:  P2 *K1 P3* to last 2 stitches, K1 P1.


Make two sides, each one as follows:


CO 38 stitches.


Note:  The first and last stitches will always be in stocking stitch (knit on right side, purl on wrong side).


Work in rib pattern for 24 rows (= 6 repeats) always working the first and last stiches in stocking stitch.
i.e.
Row 1: k1, work in rib pattern to last stitch, k1
Row 2: p1, work in rib pattern to last stitch, p1
Row 3: k1, work in rib pattern to last stitch, k1
Row 4: p1, work in rib pattern to last stitch, p1


Repeat these four rows 6 times.


Now it gets a little interesting; decrease in pattern as follows:

Decrease row 1: k1 k2tog p1k1  *p3k1*  to last 5 stitches, p2  k2tog tbl k1


Decrease row 2: p2 *k1p1* to end of row

Decrease row 3:k1  k2tog  *k3 p1* to last 5 stitches,  k2 k2tog tbl  k1

Decrease row 4: p1  k1 * p3 k1*  to last 4 stitches,   p4

Decrease row 5: k1  k2tog   *p3k1*  to last 3 stitches, k2 tog tbl k1

Decrease row 6: p2   *k1p1*   to end of row.

Decrease row 7:k1  k2tog   k1 p1  *k3 p1* to last 3 stitches, k2tog tbl k1

Decrease row 8:  * p3 k1* to last 2 stitches, p2

Decrease row 9:k1  k2tog p1 k1  *p3k1*   to last 5  stitches, p2  k2tog tbl k1

Decrease row 10: p2  *k1p1*  to end of row

Decrease row 11:k1 k2tog    *k3 p1* to last 5 stitches, k2 k2tog tbl   k1

Decrease row 12: p1  k1  * p3 k1*   to last 4 stitches,  p4

Decrease row 13:k1   k2tog  *p3k1*  to last 3  stitches, k2tog tbl k1

Decrease row 14: p1   p2tog  p1    *k1p1*    to last 4 stitches, k1  p2tog tbl   p1

Decrease row 15: k1 k2tog  p1 *k3 p1*  to last 6 stitches, k3 k2 tog tbl    k1


Decrease row 16: p1  p2tog   * p3 k1*  to last 5 stitches, p2 p2tog tbl    p1

Decrease row 17:k1 k2tog  *p3k1*   to last 3 stitches, k2tog tbl    k1

Decrease row 18: p1  p2tog   p1  *k1p1*  to last 4 stitches,   k1 p2tog tbl    p1

Decrease row 19:k1  k2tog  p1  *k3 p1* to last 6 stitches, k3 k2tog tbl      k1

Decrease row 20: p1 p2tog  * p3 k1*   to last 5 stitches, p2  p2tog tbl   p1

Bind off 10 remaining stitches. 


Sew both sides together, and you're done!