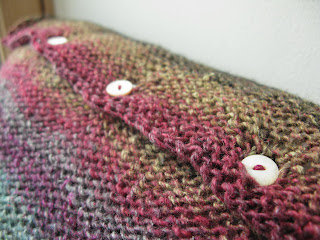
I made this cushion cover seamless and reversible because I couldn't decide which side I liked best, they're both so nice! I absolutely love this yarn, the colours are so beautiful I smile every time I look at it.
Yarn : 2 balls Noro Yuzen = 220m
Needles : One 4.5mm = US 7 circular needle
Extra Materials: 8 buttons, scrap yarn for provisional cast on, 40cmx40cm cushion.
Gauge: 17 stitches = 10cm in stocking stitch.
Size: 40cm x 40cm
Notation:
k = knit
p = purl
p = purl
CO = cast on
k2tog = knit two stitches together
yo = bring the yarn over the needle
yo = bring the yarn over the needle
Directions:
Using a provisional crochet cast on, cast on 56 stitches (see tutorial). Now cast on 50 more stitches the normal way. Knit stocking stitch in the round (i.e. knit every stitch) until cushion cover measures 40cm when slightly stretched (there's not quite enough yarn in 2 skeins of yuzen to make the cushion cover unstretched (sadly)) . Slip 53 stitches onto one side of the circular needle and 53 to the other and bind off using kitchener stitch.
Now pick up the remaining 56 stitches from your provisional cast on, so that you start on a right side row (= stocking stitch, not rev st. st.). Work as follows:
Row 1: (right side) knit
Row 2: k2 purl to last two stitches, k2.
Repeat these two rows until you have worked 2'' from provisional cast on.
Next row: k9 k2tog yo *k10 k2 tog yo* 3 times k9.
Work row 2 as above once more, then knit two rows. BO on wrong side.
The yo's form buttonholes. Sew buttons onto each side to meet up with buttonholes so that the cushion cover is reversible.
Weave in loose ends along the wrong side rows on a stripe of the same colour.


La traduccion al Español es muy mala,no entiendo nada
ReplyDeleteI'm sorry - you lost me at ". Slip 53 stitches onto one side of the circular needle and 53 to the other and bind off using kitchener stitch. " I would have thought all the stitches would have been on the needle already. Perhaps you meant to slip 53 off onto the right side? As I said - I'm lost.
ReplyDeleteYou can just pull the cord out from between the twos sets of stitches, they must appear as two rows, in order to do the three needle bind off correctly. Typically a three needle bind off is done with three needles, so that is why there is an instruction to separate the stitches to two different needles. If you know and understand three needle bind off this instruction makes perfect sense, if you are unfamiliar with the technique you can look up three needle or Kitchener bind off for more assistance.
DeleteIf you enjoy crocheting, making your own cushions is a rewarding project that allows you to showcase your skills and creativity.
ReplyDelete